Using My Solar Data for My Home Assistant Energy Dashboard
6/28/2025
13 min read
I, like many people, have a SunPower solar system on my house. In the past year, SunPower filed for bankruptcy and all their solar management was transferred to SunStrong. The problem I have with SunStrong is that they want you to pay for their monitoring services if you want any sort of historical data. I wouldn't mind this if I could get to the data myself, but I can't. You see the power monitor that sends the data doesn't expose the data on the network, it just sends it to SunStrong directly over the internet. I can't even get the data from SunStrong because they don't offer an API for it. My system is paid off and I own all the equipment, but the data it produces is held hostage from me.
Don't get me wrong, I don't mind paying for a service to store data in the cloud, I know how much it costs to store things and develop tools to make sense of the data. I just want the option to harvest my own data for my own purposes. Without this option, its more of an extortion. Plus, they are storing the historical anyway and using it for their own data science stuff.. But anyway, I digress. After a bunch of internet searching I found a way to get my data out of the system locally.
§Getting the Data
So first we need to get the data out of the monitor. I came across this blog by Scott Gruby which is mostly the guide I followed to get the data into Home Assistant... I made some improvements which I will be documenting here.
The gist of Scott's post is that you need a proxy server plugged into the management ethernet port on the physical solar monitor. Its the only place you can get the raw data. For this it's best to use a Raspberry Pi with wifi. This way you can use the ethernet port on the Pi to to connect to the management port and the wifi to connect to your home network. The "LAN" port labeled "Installer Computer" is the port you want.
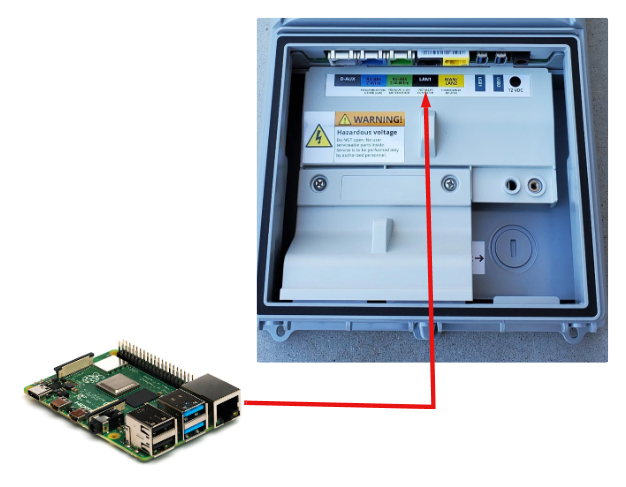
Important Caveat!
Make sure you edit /etc/dhcpcd.conf to include nogateway for the ethernet interface. Without this, when you plug in to your power monitor, your Pi routing will go sideways and won't be accessible.
interface eth0
nogateway
This management port runs the webserver on port 80 on ip: 172.27.153.1. For more information on the functions of this management server, you can read this document found on GitHub.
You can get the full device list with all the require attributes by doing this on the raspberry pi to verify it's working:
curl http://172.27.153.1/cgi-bin/dl_cgi?Command=DeviceList
This will return a JSON object of all the details we are about to feed into Home Assistant.
§Installing the Pi
So now that we know it works, I needed to come up with where I was going to put the Raspberry Pi. My solar monitor is mounted on the outside of my house, I didn't want to run an ethernet cable outside. So I did a bit of research and found a hardwire USB-C power supply by PoE Texas -> https://www.amazon.com/dp/B0CP5MVK9D. This device can be hard wired to 110V mains and produces a solid USB-C power supply. Its used in professional wall panel installations and such.
The Solar monitor has mains power going to it and there's "just enough" room to fit a Raspberry pi inside the box. So I think you are seeing where I'm going here...
I bought a Raspberry Pi kit with a plastic case to make it less sketchy that something was going to short to something else once inside the box and I got to work.
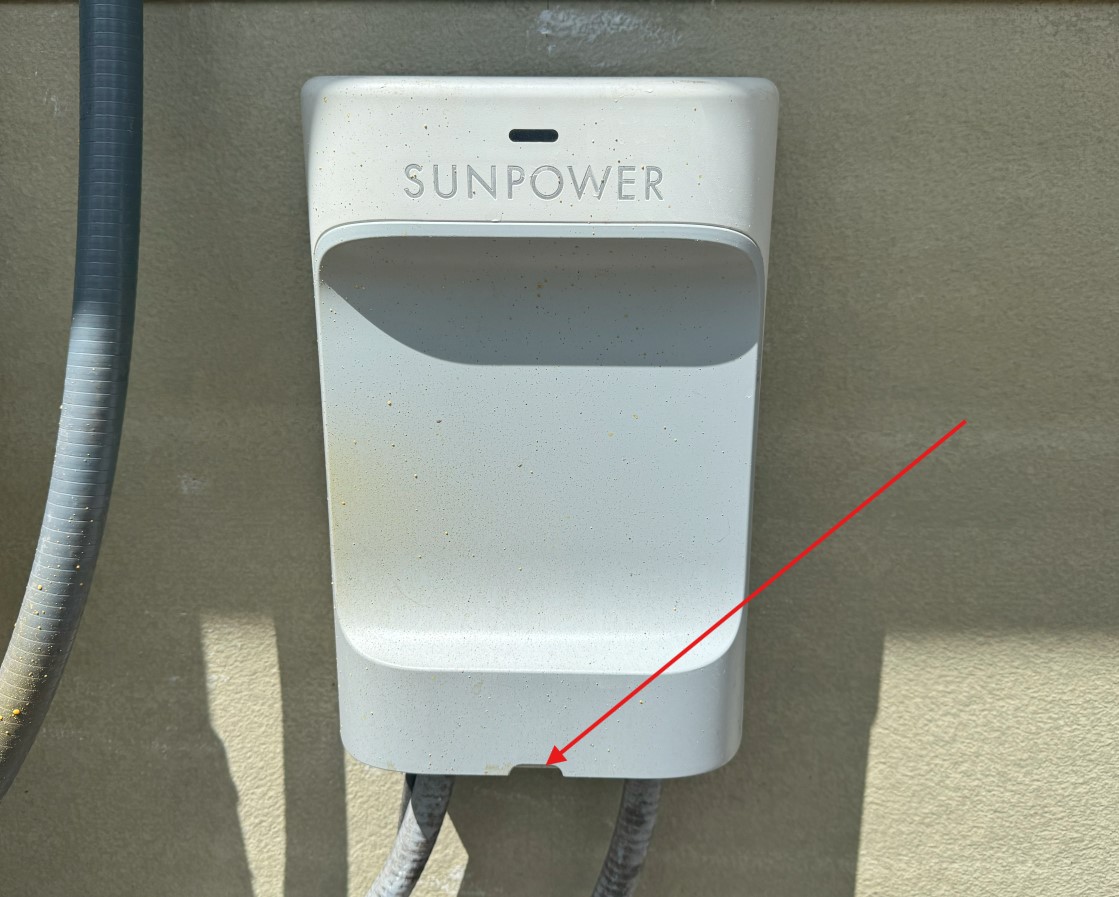
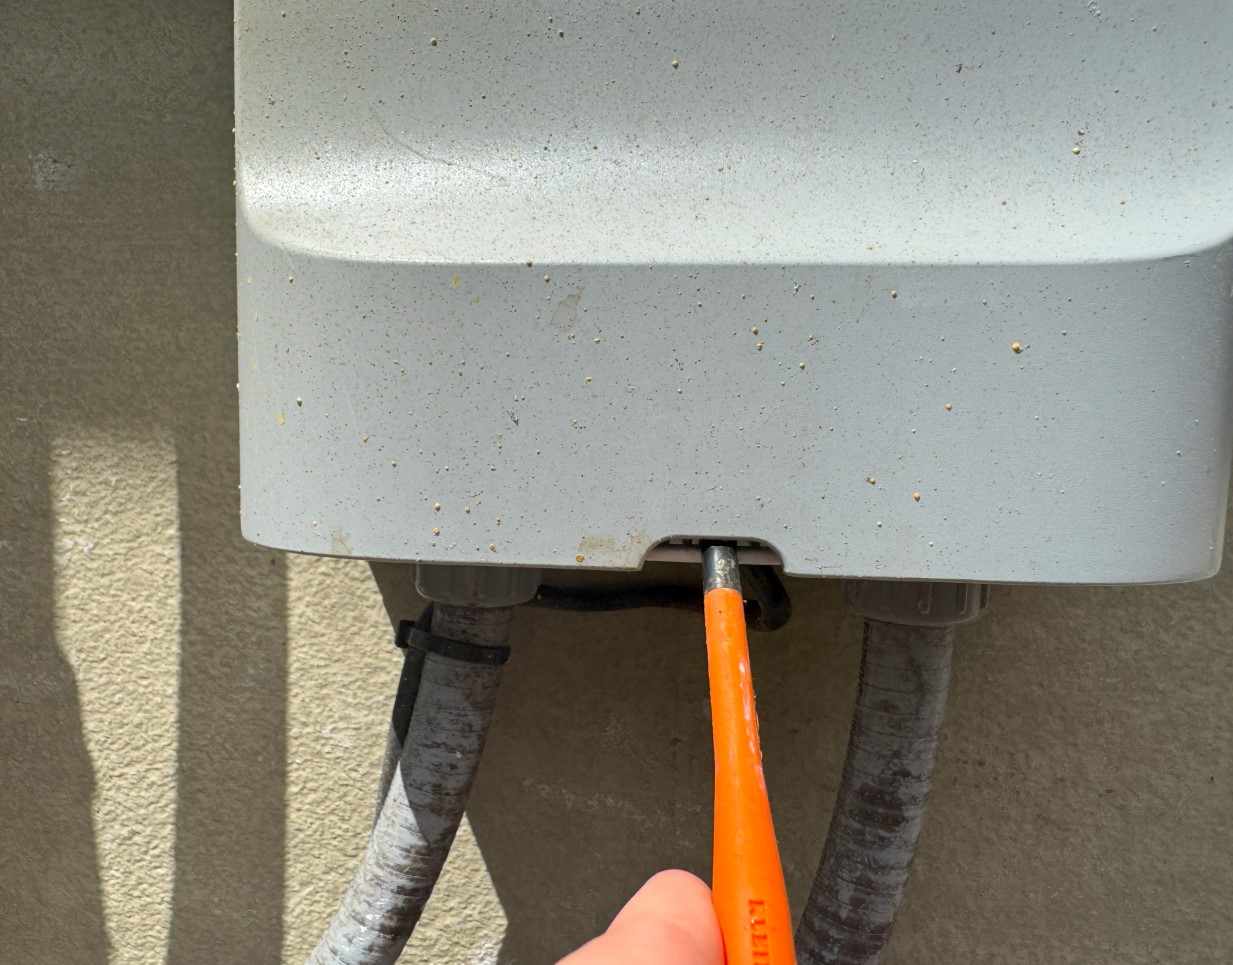
First you have to open the box.
You need to find the release tab at the bottom and shove something in there (gently) and the front pops off to reveal its squishy insides...
Now that we have it open, we can install the brain slug. I jumped on to the mains power coming into the box to connect up the PoE Texas USB-C power box. This is something I leave to you and take no responsibility for damage you may cause to your box or yourself if you don't know what you're doing. Proceed with caution and if you're not comfortable with electrical, I would suggest just running the ethernet cable into your home. Oh and, KILL THE POWER TO THE BOX BEFORE REMOVING THE COVER!.
Anyway, as you can see it fits nicely into the monitor.

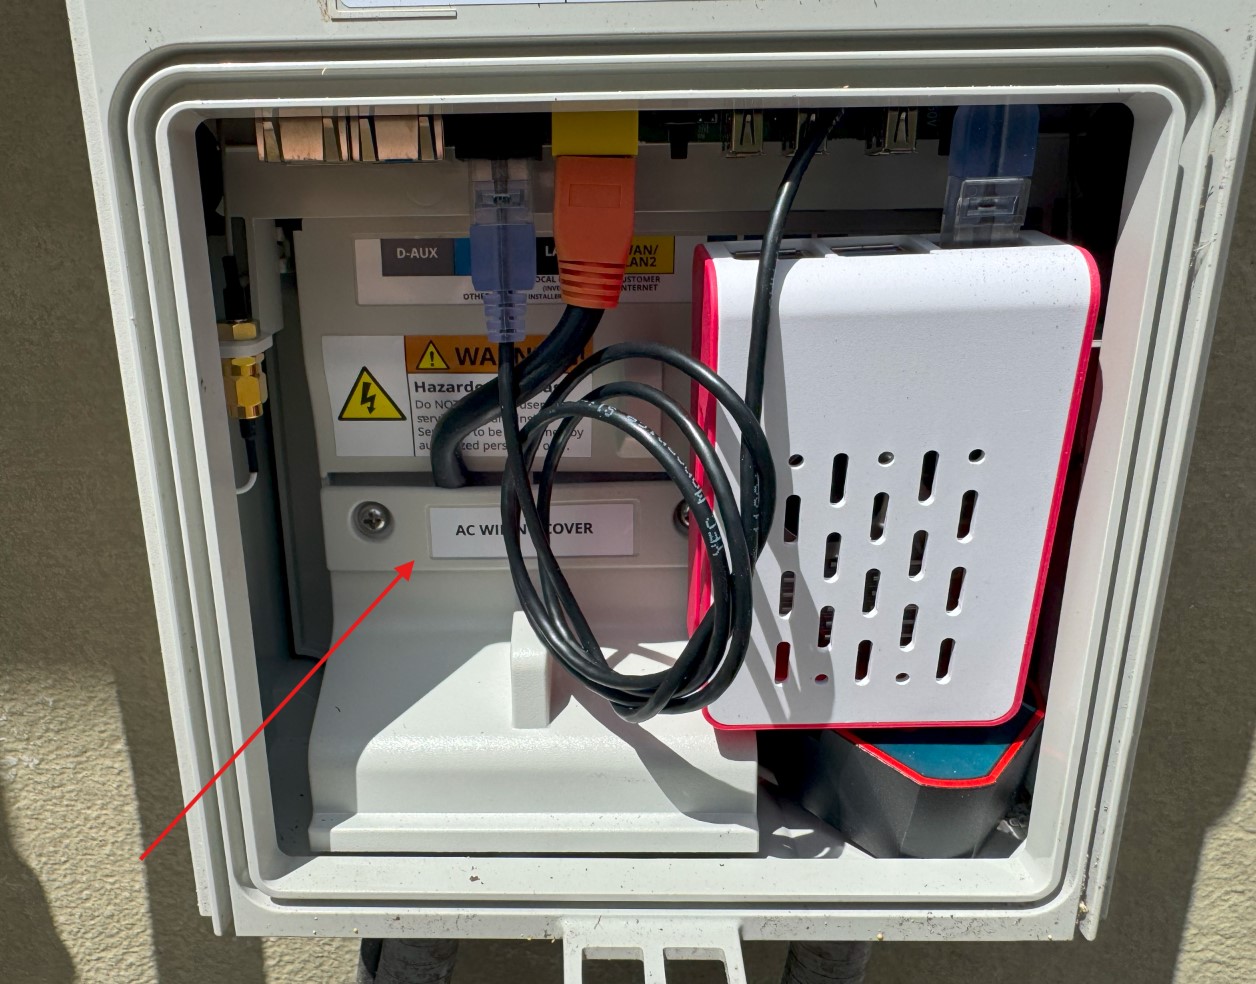 power source is spliced in under the safety shroud
§Processing the Data
Ok now that we have the Raspberry Pi all setup and running, this is where I deviate from Scott's blog a bit. You can use his Node-Red config to collect the data but I found it to be a bit unorganized in Home Assistant as everything comes in as entities with no device attached and its not clear what is what. I prefer the data to be more organized.
So instead of setting up HAProxy and Node-Red, I decided to have the solar pi process the data and push it to MQTT because I have far more control over data formatting in python. Also, the Raspberry Pi is a full on computer and can run services to push data, so why not use it?
§The Data Model
What I wanted was each device in the device list JSON to be a device in Home Assistant and all the status for that device should be entities of the device. This way its more "intuitive" in the Home Assistant way.
So I want a device for the Gateway, each Meter, and each Inverter.
§MQTT
We will do this using MQTT. So you need to install the Mosquitto broker Add-on in Home Assistant and setup the MQTT Integration. You can read the docs here and there's plenty of tutorials on getting the broker and integration setup, so I leave that to you. The requirement here is that the Mosquitto (MQTT) broker is setup and the integration is linked to it for discovery.
I have configured my MQTT broker with a username and password and I've setup the MQTT integration to enable discovery on the topic "homeassistant":

§Python Script
First you will need python3 and the requests and paho-mqtt package installed. (pip install paho-mqtt requests)
I create a python script that reads the api every 30 seconds and pushes the data to MQTT. You can find the full script here
I want to go into some key parts you will need to understand.
§Configuring the Script
At the top of the script you need to set a few things
# Configuration
# If you're running this on the bridge pi.. you can go directly to the ip instead of going through the haproxy
API_URL = "http://172.27.153.1/cgi-bin/dl_cgi?Command=DeviceList"

# If you're not running this on your raspberry pi, you need to change the API_URL to point to the correct place to get the JSON
# API_URL = "http://solarpi.local/cgi-bin/dl_cgi?Command=DeviceList" #  You can use your pi's ip address if its static

# This is your home assistant MQTT server
MQTT_BROKER = "homeassistant.local" # you can use your home assistant ip address if its static
MQTT_PORT = 1883
DISCOVERY_PREFIX = "homeassistant" # <- Make sure this is set to your discovery topic from the MQTT integration
DEVICE_PREFIX = "solarbridge"
UPDATE_INTERVAL = 30  # seconds

client = mqtt.Client()
client.username_pw_set("username", "password") # <-- Put your proper credentials here
client.connect(MQTT_BROKER, MQTT_PORT)
client.loop_start()§What the script is doing
So the script is iterating through all the devices and sending a discovery message for each attribute setting the proper topics up to receive data.
On top of this, it sets the device object to generate the devices and links the attributes to the device so everything gets organized properly.
def mqtt_discovery(sensor_id, name, unit, device_class, state_topic, unique_id, device, state_class=None):
    config_topic = f"{DISCOVERY_PREFIX}/sensor/{sensor_id}/config"
    payload = {
        "name": name,
        "state_topic": state_topic,
        "unit_of_measurement": unit,
        "device_class": device_class,
        "unique_id": unique_id,
        "availability_topic": f"{state_topic}/available",
        "device": device_object(device),
        "json_attributes_topic": f"{state_topic}/attributes",
    }
    if state_class:
        payload["state_class"] = state_class
    #print(f"Publishing discovery for {sensor_id} to {config_topic}: {payload}")
    client.publish(config_topic, json.dumps(payload), retain=True)
    client.publish(f"{state_topic}/available", "online", retain=True)
    attributes = device_attributes(device)
    if attributes:
      client.publish(f"{state_topic}/attributes", json.dumps(attributes), retain=True)
And then it posts the values of each attribute.
client.publish(state_topic, str(float(value)))It then loops forever
while True:
    time.sleep(UPDATE_INTERVAL)
push_data()§The Results in Home Assistant
Now it creates a device for each device in the list:
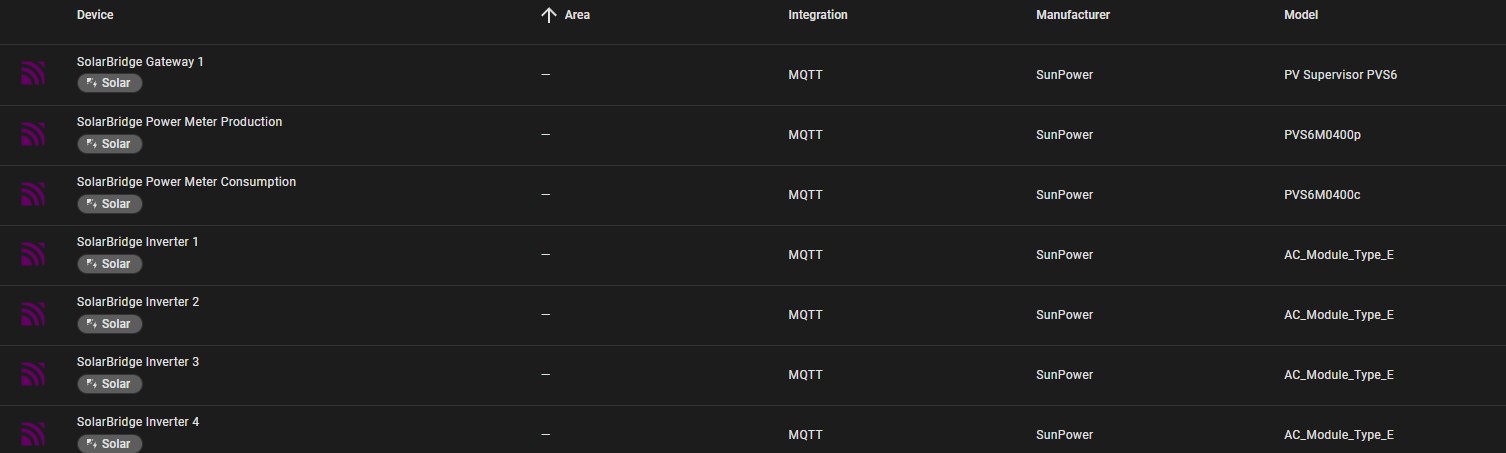
And when you navigate to a device, you can see its attributes populated as entities under the device:
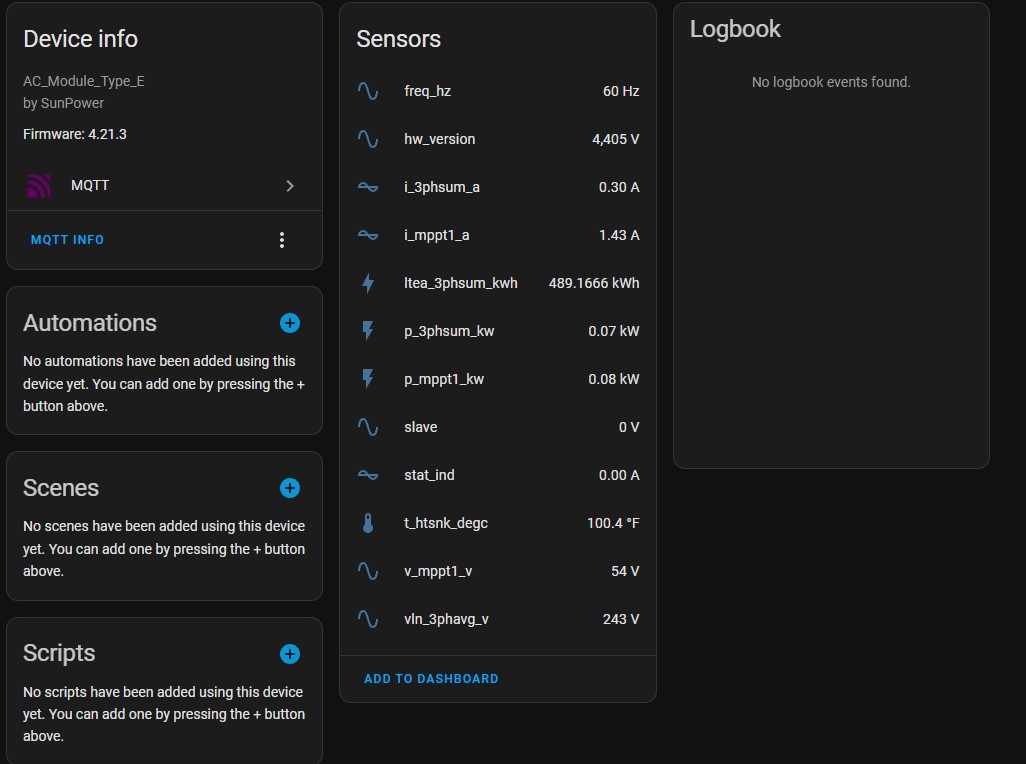 example inverter
§Setting it up as a Service
So now that we have this script working, it needs to run as a service at boot up so when the power goes out it comes back up and starts logging without intervention.
I created a service in /etc/systemd/system/solar.service with the following contents:
[Unit]
Description=Solar MQTT Uploader
Wants=network.target
After=network.target

[Service]
ExecStart=/usr/bin/python3 /home/pi/solar.py ; <-- path to your script
WorkingDirectory=/home/pi
Restart=always
RestartSec=5
User=pi
Environment=PYTHONUNBUFFERED=1

[Install]
WantedBy=multi-user.target
Then we need to enable the service and start it:
sudo systemctl daemon-reload
sudo systemctl enable solar.service
sudo systemctl start solar.service
We can check on our service with the status command:
sudo systemctl status solar.service

● solar.service - Solar MQTT Uploader
     Loaded: loaded (/etc/systemd/system/solar.service; enabled; preset: enabled)
     Active: active (running) since Sun 2025-06-29 11:14:09 EDT; 1h 34min ago
   Main PID: 755 (python3)
      Tasks: 2 (limit: 4769)
        CPU: 4.342s
     CGroup: /system.slice/solar.service
└─755 /usr/bin/python3 /home/pi/solar.py§Protecting the Pi
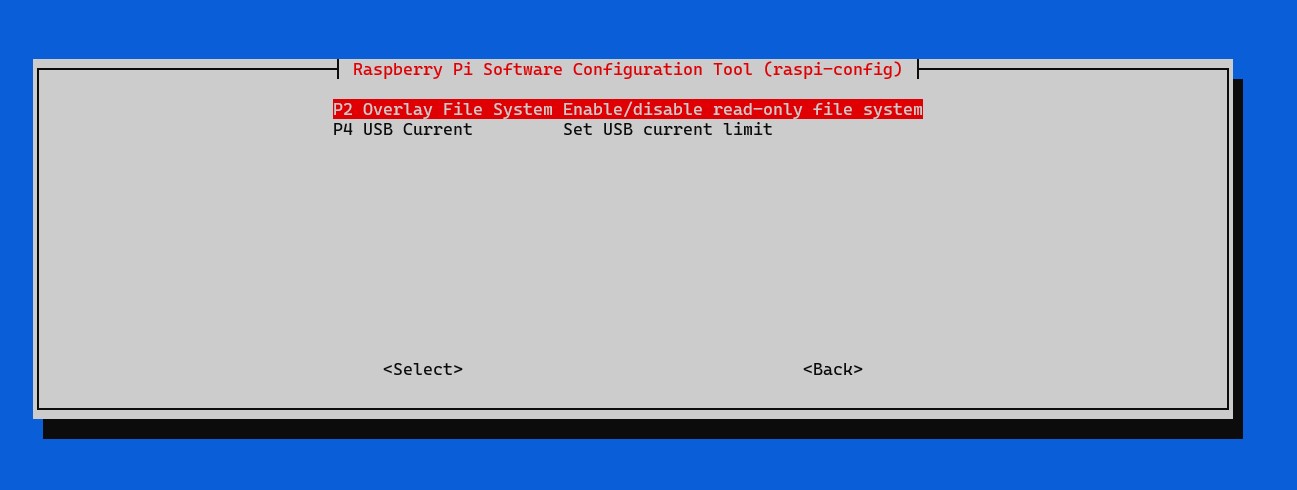
The last thing we need to do is protect the Raspberry Pi from corruption by turning on the overlay filesystem and putting the whole box in readonly mode. Without this, a hard reboot from a power outage can corrupt your SD card!
Run the sudo raspi-config command and navigate to "Performance Options" and activate the Overlay Filesystem by following the prompts to turn it on and make the bootloader readonly.
Then you reboot and the pi is "safe". You should check the status of the solar.service after reboot to verify it comes up.
note: if you want to make changes that will stick through a reboot, you will need to deactivate the overlay filesystem!
Also, if you reboot and see an error in the solar.service status that looks like this:
solarpi python3[755]: [ERROR] HTTPConnectionPool(host='172.27.153.1', port=80): Max retries exceeded with url: /cgi-bin/dl_cgi?Command=DeviceList (Caused by NewConnectionError('<urllib3....There is nothing to worry about if the service is running and it doesn't keep adding more lines with the error. This is caused by the solar service starting before the ethernet link is fully setup and the first couple calls fail because it can't reach the management interface.
§Tie It All Together
Now that we have the data feeding into Home Assistant, it's time to make some pretty dashboards!
§House Keeping
I would suggest renaming some things to make it easier to understand later. (I chose to rename it in Home Assistant, instead of doing it in the python script because I want the raw data to match the JSON object)
§Rename the Meter Devices
Find the Power Meter device with CAL0 entity reporting as 50. This is your Solar production meter.. So rename it to "SolarBridge Power Meter Production" or something like that.
The other meter device has a CAL0 of 100 which means its the grid consumption side... so I renamed it to "SolarBridge Power Meter Consumption".
§Entities to Rename
Under your production meter, you need to find the entity named net_ltea_3phsum_kwh and rename it to "Solar Produced Total" or something similar (you'll see why later).
Under your consumption meter, you need to find a couple entities:
- find
net_ltea_3phsum_kwhand rename it to "Net Power Consumed" -> this is your calculated power consumed after returns. - find
pos_ltea_3phsum_kwhand rename it to "Consumed from Grid Total" -> this is power coming into from the grid. (pos = positive usage) - find
neg_ltea_3phsum_kwhand rename it to "Returned to Grid Total" -> this is power going out to the grid. (neg = negative usage)
Now we have everything we need to setup the Energy Dashboard.
§Setup the Energy Dashboard
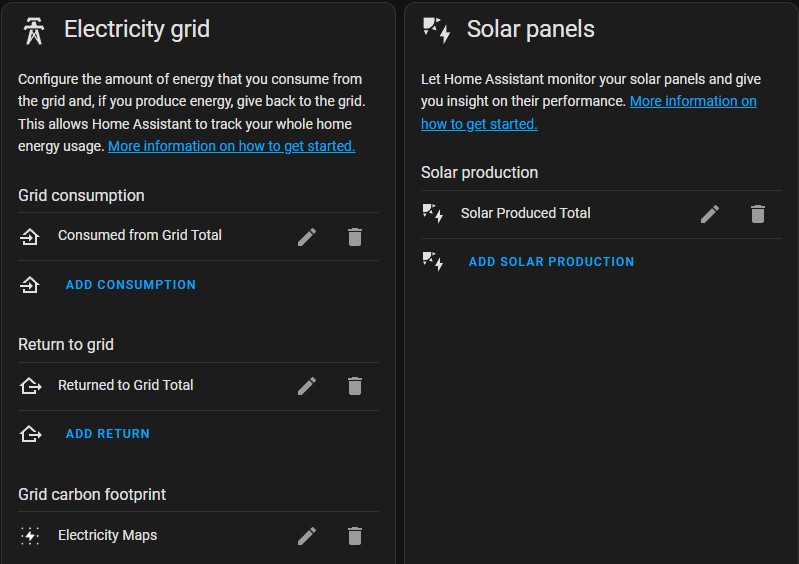
In Home Assistant navigate to the Energy dashboard and configure the entities.
- Grid Consumption =
Consumed from Grid Total - Return to grid =
Returned to Grid Total - Solar production =
Solar Production Total
I also suggest setting up the Electricity Maps integration to get Carbon footprint data which is pretty revealing on how impactful your grid power is.
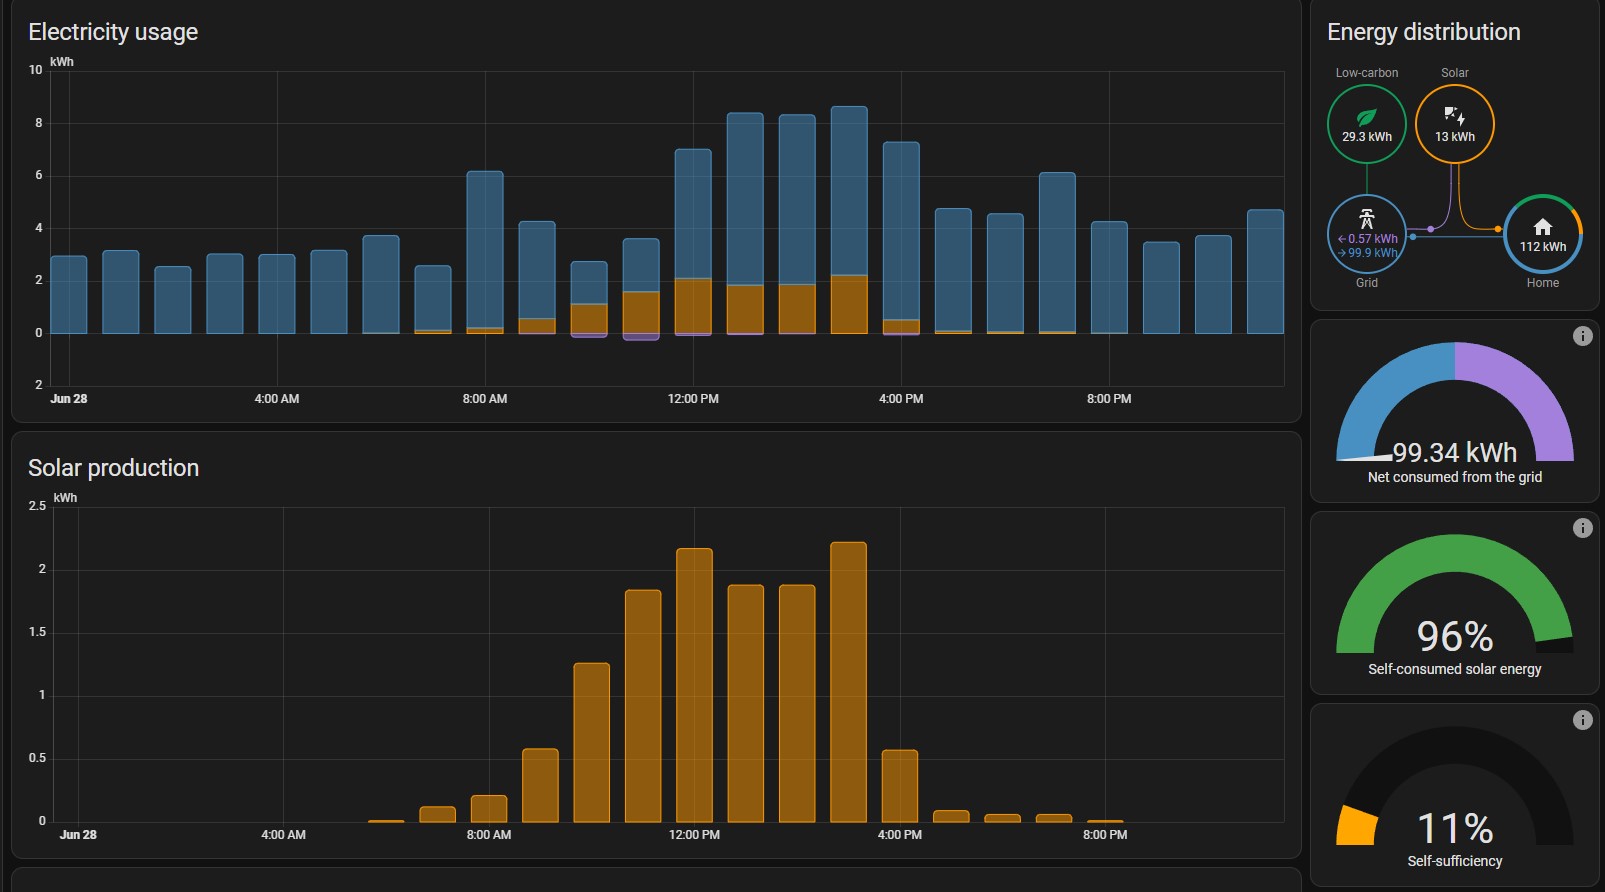
And after a few hours of data collection the dashboard should start working and look something like this:
§Additional Dashboards
The energy dashboard is all good for historical data and hourly aggregates, but I want to know the real-time consumption of my house.
I created a power dashboard that shows me a ton of stats and it updates every time the script updates the data (every 30 seconds)!
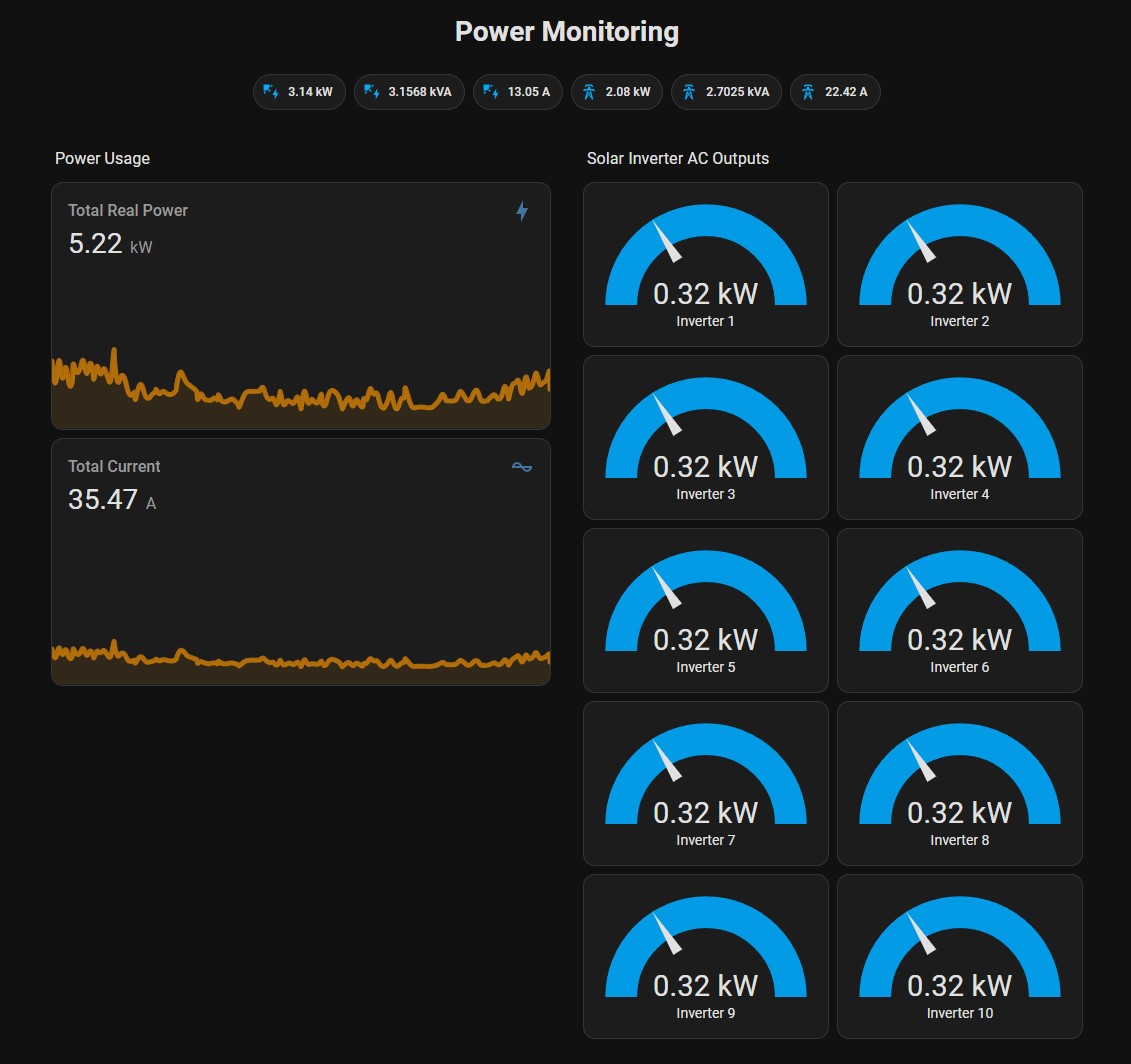
In this dashboard you can see entity chips showing my solar side power production (3.14kW), apparent power (3.15kVA), and current (13.05A); along with the grid side matching numbers.
The Power Usage graphs show the real-time power and current draw at the meter. This is the current usage my house is pulling through the wires! Pretty neat!
Beyond this data, I have each power inverter's AC side power production graphed.
The sky is the limit here and there's quite a bit of data coming from the solar power meter. There' power factor, apparent vs real power, and more.
§Getting Accurate Grid Side Power Numbers
So the grid side numbers are tracked on both phases of the power. So you'll need to create a helper to "combine" some numbers to get the real number. If you look at the current on the grid side you'll find an entity named i1_a and another named i2_a. These are phase 1 and phase 2.. or both sides of your 220V. You'll need to combine those to create a single "current" draw number for your house.
If you navigate to "Settings" --> "Devices & Services" and then click on "Helpers" on the top you can create a new helper to "combine entities". Select the 2 entities and make sure you select "Sum" as the "Statistic Characteristic" to get it to do the correct math.
For my "Total Real Power" graph I had to combine the p_3phsum_kw or Average Real Power on both the Consumption and Production meters to get an accurate number.
§Conclusion and What's Next
This was a bit more involved than Scott's original post, but I really like where I got it. The dashboard is easy to read and understand and the data is nicely grouped into logical buckets for further dashboard development.
When setting up the energy dashboard, there's an option for water consumption which has me interested. My meter isn't really accessible (its out by the road) and there's no api from the water company. I'm thinking about installing a water meter with a pulsed output to watch with ESPHome or something. I even found that my water softener has a pulse sensor that may also be an option over plumbing my own meter. We'll see.